
 Search

Word of Caution. This information is gleaned from my many attempts/single clear of the fight. Some of it may be wrong, but its enough to get an idea of the battle.
The biggest reason I am making this guide, as opposed to finishing my Paladin guide, is because a lot of our FC members are beginning to show an interest in clearing the Binding Coil of Bahamut. This guide will be in two parts: Before the fight, and the actual fight.
Before the Fight
Now, before you can actually jump into the fight to learn the mechanic, you need to meet a few requirements. (This is assuming you have the Binding Coil unlocked, already.)
Once you've gotten that all taken care of, its time to learn the fight...
Turn 5 Mechanics
99.997% of Turn 5's difficulty, comes from the sheer number of mechanics thrown at the raid group during the fight. Im gonna try to break down the battle by phases to make it easier to understand. But first, lets take a look at the arena.
The party will all stand at the entrance to the arena. The entire border of the ring will become an instant kill zone if you enter it after the battle begins, so be careful. Before the battle starts, however, it is safe. It is recommended to not cross the line until the tanks move in to pull.
From here, Turn 5 is finished. Enjoy the cutscenes that follow (Plot twists galore) and good luck on the loot rolls! One i95 allagan weapon and an i90 allagan armor piece will drop.

The biggest reason I am making this guide, as opposed to finishing my Paladin guide, is because a lot of our FC members are beginning to show an interest in clearing the Binding Coil of Bahamut. This guide will be in two parts: Before the fight, and the actual fight.
Before the Fight
Now, before you can actually jump into the fight to learn the mechanic, you need to meet a few requirements. (This is assuming you have the Binding Coil unlocked, already.)
- Accuracy Cap
The trick with the accuracy cap, is that its not based on your class. It is based on where you are standing in relation to the enemy when you start your attack. There are three positions you can attack from in FFXIV: Front, Flank, and Rear. Instead of describing this, here's a picture of a targeting circle in the game, with the three positions labeled on it:
With that established, here are the recommended Accuracy stats for clearing Turn 5 without missing a single attack:
Recommended positions for each job:
There's a caveat to the SMN's Accuracy cap. While the SMN itself only need to meet the Rear accuracy cap, the pets they summon need to meet the Flank accuracy cap. As for exactly how much DPS gets lots of the pets do not meet the cap, I do not know, but this is what Ive found from the threads on Reddit and BlueGartr.
Now, you ideally want to shoot for the Front accuracy cap, so that none of your attacks will miss no matter where you're standing, but for the sake of getting a clear at the minimum requirements, these numbers will work perfectly. - Party Composition
Most dungeons and raids, you don't really need a specified party setup to clear them. Turn 5 is a little different. The three restrictions to the party are that you bring at least one Scholar (explained later), a Black Mage or Summoner, and a Paladin. Having these three will make your runs a lot easier. It can be cleared without them, but life will be more difficult.
Once you've gotten that all taken care of, its time to learn the fight...
Turn 5 Mechanics
99.997% of Turn 5's difficulty, comes from the sheer number of mechanics thrown at the raid group during the fight. Im gonna try to break down the battle by phases to make it easier to understand. But first, lets take a look at the arena.
The party will all stand at the entrance to the arena. The entire border of the ring will become an instant kill zone if you enter it after the battle begins, so be careful. Before the battle starts, however, it is safe. It is recommended to not cross the line until the tanks move in to pull.
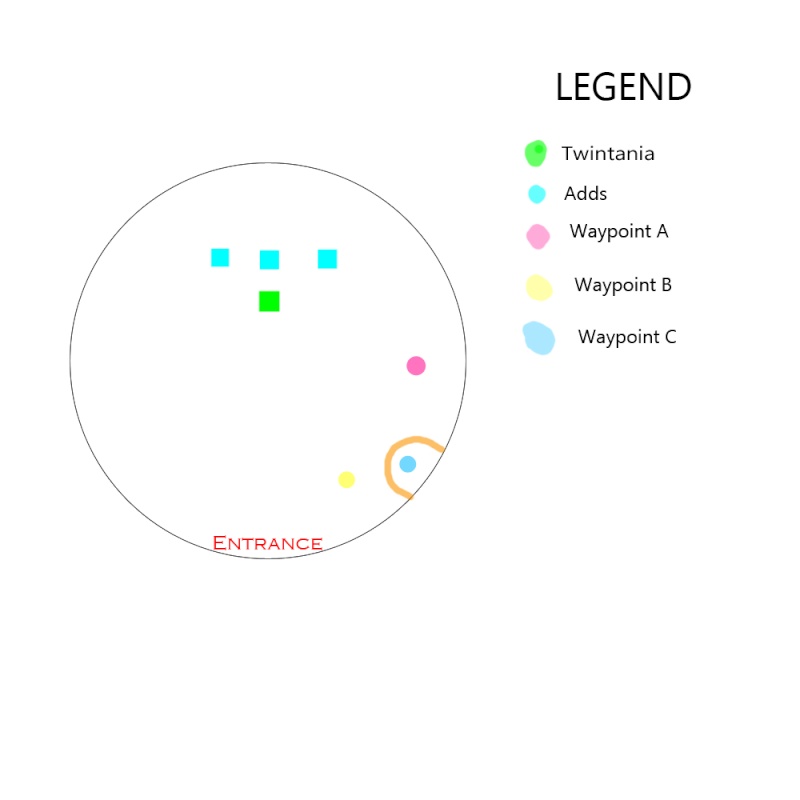
- Phase 1
The first phase of the battle is the easiest of the battle. Enjoy it, for it does not last long. Make sure everyone has Twintania on Focus Target for later in the battle.
The phase begins with the Off Tank making the initial pull. The main tank will grab Twintania from the mess and tank it with its body floating as centered on Waypoint A as possible. The off tank and DPS will focus on killing the threes Scourges (also known as Adds, because screw them.) before making their way over to Twintania. When fighting the adds, the off tank needs to make sure that the adds are not positioned in any Liquid Hells. The adds will target three random players and spit a high damaging fire AoE that lingers on the ground.
Once the adds are down, the team moves over to Twintania and gets into position for the next phase as shown below:
Make sure no one passes the red line. They will get hit by Twintania's cleave, and it will make your healers hate you. The team burns Twintania down to roughly 84% health. At this point, Twintania will drop a Neurolink for use later in the fight. This also marks the end of Phase 1. - Phase 2
The reason the team is split like this, because it creates two groups: A Soak group (The OT and the pet[This is why a SCH/SMN is necessary for this turn]) and a Conflag group (Everyone else but the MT). This is the mechanic for all of Phase 2. Shortly after Twintania drops the first Neurolink, a random player (Except for the main tank) will have a red pyramid appear above their head. This player must run to the Soak team and await the incoming fireball. The two players and pet will "soak" the damage from the fireball, reducing damage dealt. This also serves a second purpose, explained shortly. After the fireball hits, the player targeted returns to the Conflag team and the main tank pulls Twintania to float above Waypoint B for the remainder of Phase 2.
The second mechanic for this phase is the Conflagration. A random player, minus the main tank, will have a blue circle appear above their head. This player must run underneath Twintania and wait for the conflag to appear. This player will be bound and can no longer act. The DPS and Offtank must destroy the conflag before it detonates and kills the player inside.
"But Steven, how long do we have to do that?"
Excellent question! The amount of time you have to destroy it is determined by the number of targets hit by the previous fireball. The less targets it hits, the more time you have to kill a conflag. This is why we have a three target soak team of OT, Pet, and targeted player. Now, should a player become a target for a fireball while there is an active conflag, the target player runs into the conflag. The conflag will take the damage of the fireball in place of the players, and it will not affect the next conflagration's detonation timer at all.
So in a nutshell, this mechanic goes: Fireball (determines length of conflag) -> Conflag -> Fireball during Conflag -> Repeat. A key point to note, is that if a fireball pops during a conflag, do not destroy the conflag until after the fireball has gone off, or you risk killing both players inside when the conflag disappears.
Your goal in Phase 2 is to destroy at least three Conflags, but no more than four, before Twintania hits 54%. If your raid is at 56-60% and the last conflag was destroyed a while ago, it is best to stop DPS on Twin until the fourth conflag is destroyed, and then you may burst it down to 54%. When Twintania hits 54%, it will drop the second neurolink for later use, and the entire team must run and stack on Waypoint C for Phase 3. - Phase 3 - The Divebombs and Snakes Phase
This phase is the phase that makes or breaks a run at Turn 5. Dodging the divebombs and properly transitioning the snakes after the second set of divebombs is crucial to getting a clear. Shortly after dropping the second neurolink, Twintania will fly away from the stage. Anybody not on Waypoint C within 3-5 seconds of Twin leaving the stage is going to cause a wipe in most circumstances.
In this phase, you are on a small time limit. You have from the moment Twintania leaves the stage, to when Twin returns in a flash of blue light to complete this next phase. If your team cannot do so, you will have very high chances of wiping (Borderline instant wipe) going into Phase 4.
Phase 3 begins with Twin leaving the stage. All players should be stacked on Waypoint C at the bottom of the depression towards the NW edge of the ring. (The party enters from the North) One player will be targeted with a green circle. The party must all run to the top of the hill, wait for Twin to fly overhead, and return to Waypoint C again. This repeats two more times. Please keep in mind, any players thrown away from Waypoint C by the Divebomb must wait to go back into the pit until after the next Divebomb has occurred, or you will all wipe. After the third divebomb has passed, a big snake and two smaller snakes will spawn. The party must remain grouped at Waypoint C, pictured below: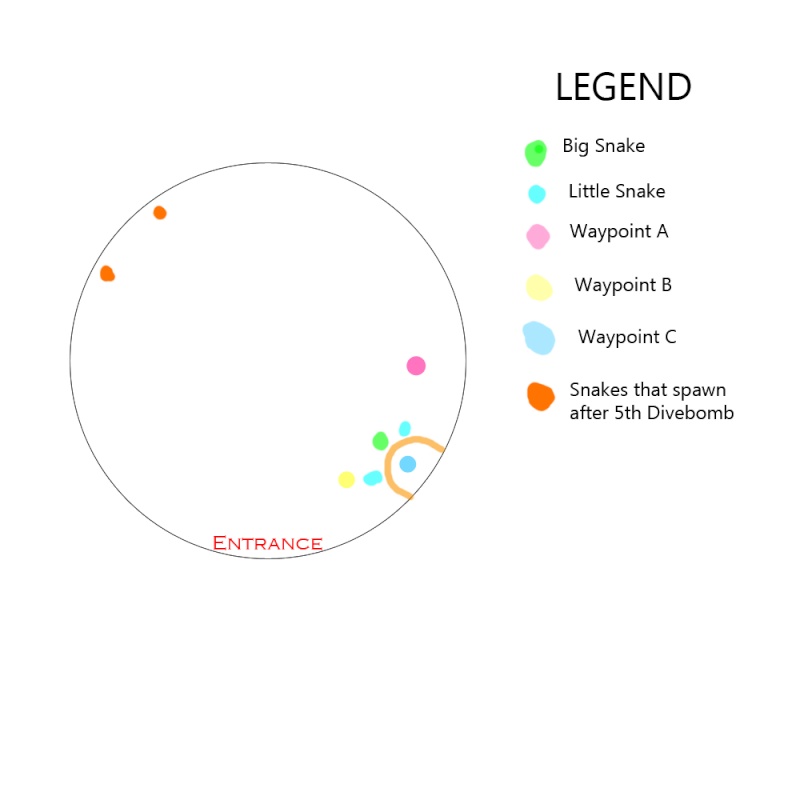
At this point, the team has 45 seconds until the 2nd and final set of divebombs. The DPS must burn the little snakes down to roughly 50%. The off tank will maintain aggro on the little snakes, while the main tank holds the large snake. The DPS are not to touch the big snake until both little snakes are below 50% health. When a player gets targeted with a green circle, the team repeats the divebomb strategy while maintaining as much DPS as possible. It is far more important to dodge the divebomb than it is to keep your DPS up at this point. After the 2nd divebomb strikes of this set, the off tank will pull the little snakes all the way to the other side of the room and grab the 2nd set of little snakes, while the rest of the team stacks at Waypoint C to dodge the final divebomb. When the final green circle pops, the entire team runs to the middle of the stage to group the snakes up for the caster limit break. (This is why a BLM/SMN is necessary for Turn 5) The initial set of little snakes should be low enough that the LB will kill them immediately, and should drop the 2nd set of snakes roughly to 50% each, and deal roughly 25-40% damage to the big snake, depending on the party's average iLevel. When the little snakes are killed, they need to be as close to the other snakes as possible. They explode and inflict a debuff on anyone nearby (Party member or enemy alike) that increases the damage they take and reduces the damage they deal. This is crucial to killing the biggest snake before Twintania returns. As soon as all four little snakes are dead and their debuffs applied, the main tank takes the big snake over to the neurolinks at Waypoints A and B to prepare for the transition to Phase 4. The large snake must be killed before Twintania returns to the stage, and the team will not have a lot of time to do so.
Once the large snake has fallen, the main tank stands alone in the Neurolink at Waypoint A, and the rest of the team stands in the Neurolink at Waypoint B. Healers are to AoE heal and buff everyone as much as possible in anticipation of Phase 4. - Phase 4 - Twisters and Dreadknights
When Twintania returns, it will unleash its ultimate attack. Anyone not standing in a Neurolink and at full health will die. Immediately following this attack, Twin will Plummet the main tank, and then the team needs to move into position for the next set of mechanics: Twisters and Dreadknights.
Both sets of mechanics are Instant Death Delivery Systems! (IDDS, for short) Should you fail the mechanics check, you will die, and your team will hate you. A lot. Pictured below is a general idea for positioning, and a general idea for dodging twisters, given a standard party set up of 2 tank, 2 heals, 2 melee DPS and 2 ranged DPS:
I need to reiterate here. Failing the mechanics checks from here on out will cause you to die, and possibly a raid wipe. Please pay attention to the Focus Target bar and the locations of your teammates.
Twintania's only clue to Twisters is the cast bar. The whole team needs to move during the entire cast of Twisters. Once the bar fills and goes away, the team needs to avoid any twisters that spawned and get back to their original positions. The team also needs to remain spread out as much as possible for two reasons:
1. Running into another player during a Twister cast will cause anyone in the immediate area to be killed.
2. The Dreadknight mechanic needs as much space between the player and center stage as possible to make it easier for the team
After the first successful Twister dodge, Twin will target a random player and stunlock them in place with a jail, and a Dreadknight will spawn. The Knight will haul ass (And I literally mean HAUL ASS.) to the jailed player and instantly kill them. The Paladin should be the off tank at this point and needs to stun the Dreadknight as soon as possible and the casters need to inflict Slow as much and as often as possible (Paladin stuns are 6s to start with and are the longest available to the raid team). Now, while the dread is hauling ass to the jailed player, Twintania will still be very much casting Twisters on everyone. So everyone needs to be running routes to avoid twisters without running into other players and DPSing the Dreadknight to prevent an instant kill. This phase repeats until Twintania gets to about 30% HP and drops a third and final Neurolink. Clearing this phase is often considered the "Home Stretch" and usually leads to a clear of the raid, but its not a good time to get complacent. - Final Phase
As soon as Twintania hits 30% and drops the final neurolink, all ranged DPS and healers need to stand as close to the Waypoint A and B Neurolinks as possible, while still being in range of Twintania and the raid team as possible for heals/DPS. The main tank does not move Twintania at all and the offtank stands directly in the third neurolink to effectively nullify the new mechanic called Hatches. Twin will poop an orb out directly below it that will target and kill one player not standing in a Neurolink. As long as Twintania hasnt moved at all, this orb will land directly on the offtank, standing in a neurolink. The OT will take the damage, and the fight will progress. Twintania's trump card for the final phase is a spam of Liquid Hells. Similar to Phase 1, Twin will target a random player and shoot FIVE Liquid Hells at them. The targeted player needs to run to the outside edge as fast as possible, and deposit them all away from the raid team as best as possible. Should the main tank get targeted, they are to eat two of the hells, use Hallowed Ground/Holmgang and dump the last three in the same spot and rotate Twintania without changing its position to avoid the attack. Should the OT be targeted, all ranged players must jump into the neurolinks, the melee DPS jump into the OT's old neurolink, while the OT dumps the hells as far from the raid as possible, and return to the neurolink. Once the OT has returned to the neurolink, the DPS and healers may leave the neurolinks to resume healing/DPS. This repeats until Twintania dies, and the raid is complete.
From here, Turn 5 is finished. Enjoy the cutscenes that follow (Plot twists galore) and good luck on the loot rolls! One i95 allagan weapon and an i90 allagan armor piece will drop.
